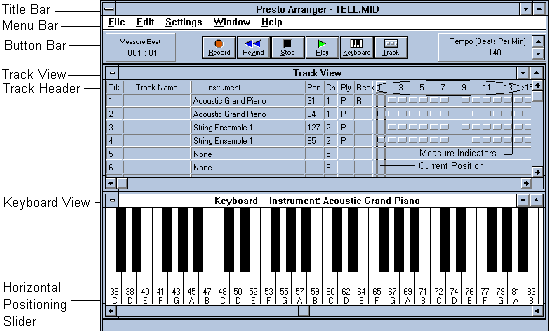
Presto Arranger consists of several areas, as shown below:
Product Overview
Presto Arranger lets you play, modify, and create music using your PC and audio hardware. Even without musical training or special equipment, you can do all of the following:
Presto Arranger's Controls
Presto Arranger consists of several areas, as shown below:
Selecting Views: Track View or Keyboard View
When you first launch Presto Arranger, it shows both the Track and Keyboard views. To see only one or the other, press either the Keyboard or Track button in the Button Bar. To show both at once again, select either the Tile or Cascade menu item from Presto Arranger's Window pull-down menu in the Menu Bar.
Loading and Playing a MIDI Music File
To have Presto Arranger play existing MIDI music files:
1. From Presto Arranger's File pull-down menu, select the Open menu item.
2. In the Open box, navigate among the directories to locate and highlight the .MID file you want to play. Click on the OK button. You will be returned to the main Presto Arranger screen. Note that the Title Bar will now show the name of the loaded MIDI file.
3. Press the Play button on Presto Arranger's Button Bar.
You should hear your song playing and see the double vertical bar in the Track View window moving to the right, indicating the current position in the music file.
Tip: To adjust how loudly the song plays on your system, locate the volume control program that came with your audio hardware. It is not part of Presto Arranger itself. It often is called a Mixer Control or Volume Control applet or panel.
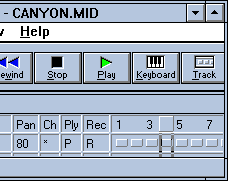
Controlling Song Position
When you click on the Play button, Presto Arranger starts playing from the current position. Current position is always indicated by the double vertical bar in the Track View window. There are two ways of controlling your current position in a loaded MIDI file:
The "Player Piano" in Keyboard View
While Presto Arranger plays a MIDI file, its on-screen keys play along with the music, in the manner of an old fashioned player piano. It only can show the keys playing a single MIDI track at once. You pick the track to have it play by using your mouse to place the "R" in the Rec column of Track View along the desired track.
Selecting a MIDI Output Device
Depending on your audio hardware, you may be able to specify different ways to play MIDI music. To choose the MIDI output device, select an Output Device from Presto Arranger's Settings menu. Typical choices could include:
An Absolutely Minimal Music Overview
Presto Arranger displays each MIDI song in "tracks". Typically, each track corresponds to the part a single instrument plays in the song. The music in each track is shown as a series of small rectangles. Each rectangle represents a "measure" of music. Each measure is a few "beats" of music -- depending on the particular song, a measure is often about a second of music.
For each track, you can change the instrument that is playing, speed up or slow down an entire song by altering its "tempo", change how loudly it plays (its "velocity"), change how "high" or "low" it sounds (its "pitch"), decide where it should seem to play between your speakers (its "pan" position), and delete measures of music from one part of the song and paste them into other locations.
Changing Instruments
To change the instrument in a track:
1. Open (or create) a MIDI file.
2. In the Track View window, click on the name of the instrument you want to change. A list of available instruments will appear.
3. Select the instrument you wish from the instrument list.
4. Click on the OK button in the Select Instrument box to return to the main screen with the instrument change in effect.
Changing An Instrument's Pan (Left/Right) Position
To change the position (from left to right between your speakers) at which an instrument appears:
1. Click on the Pan cell in a track containing the instrument you wish to position.
2. In the resulting pop-up window, specify a number from 0 to 127; 0 indicates that the instrument should play only from the left speaker, while 127 dictates that it should play from the right speaker. For example, 31 would have three quarters of the instrument's output come from the left speaker and one quarter from the right speaker, "positioning" the instrument one quarter of the way from the left speaker to the right speaker.
3. Click on the OK button to return to Presto Arranger's main screen with the Pan setting in effect.
Changing Pitch & Volume
To change the pitch or volume for selected measures:
1. Use the mouse to select the measures you wish to modify. (You select the measures by clicking on the first measure you want to select and holding the left mouse button down while dragging the mouse cursor to select additional measures.)
2. Select Adjust Volume or Adjust Pitch from the Edit menu.
3. In the resulting adjustment box, enter the number from 127 to -127 to add to the current volume or pitch. The resulting addition must produce a number from 0 to 127.
More About Pitch: The pitch number is that displayed on each key in the Keyboard View window. For example, Middle C has pitch number 60. To change the pitch of the selected notes, enter a positive or negative number to add to the pitch of each note. For example, to increase the pitch of the selected notes by one octave, enter 12. To decrease the pitch by one octave, enter -12.
Editing Songs with Cut and Paste
To delete parts of a song or move them to another location:
1. Use the mouse to select the measures you wish to modify. (Click on the first measure you want and hold the left mouse button down while dragging the mouse to select additional measures.)
2. Select Cut or Copy from the Edit menu.
3. To paste the measures from the clipboard into the current song, click on the destination point and select Paste or Paste Repeatedly from the Edit menu.
Changing the Tempo of an Entire Song
To change the speed at which a song plays, use the up and down arrows to adjust the Tempo (Beats Per Minute) settings on the Button Bar:
Presto Arranger lets you record your own MIDI music and save it in a file, or add music you create to an existing MIDI song.
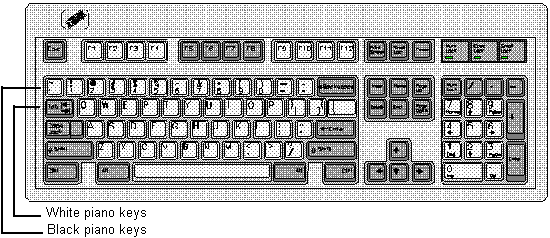
Your Choice of Keyboards
Presto Arranger lets you play and record music through your PC audio hardware using any of three input devices:
Recording Music
To make your own music, regardless of the MIDI input device:
1. To add your music to an existing MIDI song, load the song by selecting Open from the File. To record a completely new song, select New from the File menu.
2. Select the track to which you want to add your music. Click on the Instrument name in the track, and specify the type of instrument you wish to play.
3. Click on the Rec cell in your track to indicate the track you wish to use to record.
4. Click on the Measure Indicator in the Track View Header to specify at which measure to begin recording.
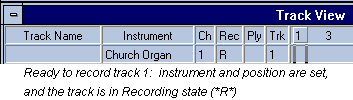
5. Click on the Record button in the Button Bar, and begin playing. If you are recording into an existing MIDI song, you will hear the song play while you play, so you can play along with the song.
6. When you are finished playing, press the Stop button. Now you can play back the song with your piece included, and edit the song as described earlier in this manual.
7. If you would like to add a comment to the track you recorded, click on the Track Name cell in your track, and type your comments into the Track Name box that is offered.
8. When you are satisfied with the result, select Save from the File menu to save the song.