(For CD Player)
- Insert an audio CD into your CD drive. If CD Player recognizes it as one which you've previously described, it will display the name of the CD and its first track.
2. Press the Play button to start playing the selection.
Playing Multiple Selections Using a Playlist
Note: Playlist creation is described later.
1. Load the desired playlist, as follows:
(For MIDI Player or Wave Player)
- Click on the Playlist button or select Edit Playlist from the player's menu.
- Click on the Open button in the Edit Playlist box.
- Move among the directories to locate and highlight the desired playlist file (file with a .MPL file extension for MIDI Player, or .WPL extension for Wave Player). Click on OK.
(For CD Player)
- Insert an audio CD into your CD drive. If you've previously created a playlist for the CD, CD Player will display the name of the CD and its first track. If you haven't created a playlist for the CD, CD Player will assume that the playlist consists of all the audio tracks (songs) on the CD, in their normal order.
2. To play in shuffled order or repeatedly, click on either or both of the player's Shuffle and Repeat buttons.
3. Click on the Play button to start playing.
Creating Playlists (MIDI Player or Wave Player)
With MIDI Player and Wave Player you can create "playlists" of files, letting you create your own "albums" to suit your needs.
To create or load a playlist:
1. Click on the Playlist button, or select Edit Playlist from the component's menu.
2. To load an existing playlist, click on the Open button and choose the playlist file you want to use (file with a .MPL extension for MIDI Player, or .WPL extension for Wave Player). Click on OK.
3. To create or edit a playlist, in the Edit Playlist window highlight each file you want, and add it by clicking on the Insert button. The file(s) will be added to the end of your playlist, or inserted immediately following any file you've highlighted in your playlist.
- To add all the files, click on Insert All.
- To delete files, highlight them and click on Remove .
- To save your playlist to disk, click on Save As.
- When finished, click on OK.
4. When you click on Play, you will play all the files in the playlist.
Creating Playlists (CD Player)
To create or load a playlist:
1. Click on the Playlist button, or select Edit Playlist from the CD menu. You will see CD Playlist window.
2. Type the CD's name in the CD Title field.
3. CD Player detects the tracks on the CD, and initially names them Track 1, Track 2, etc. Enter a more descriptive name for each by highlighting it in the left column, typing a new name in the Track Name field, and clicking on the Update Track Name button.
4. After naming the CD and its tracks you can also change the order in which the tracks play, described below, or finish now by clicking on OK to save this information for future use.
5. Unless you modify it, the playlist consists of all the tracks in the order they appear on the CD. You can create your own playlist for the CD, to skip over some songs or change their order:
- To delete tracks, highlight them and click on Remove.
- To add a deleted CD track back to the playlist, highlight it in the left column listing CD tracks and click on Insert. The track name will appear in the right column, either at the end of the list or immediately after a highlighted track name.
6. When you click on Play, you will play all the tracks in the playlist.
Recording Wave Audio
Wave Player lets you record and save your own wave files, as follows:
1. Choose an audio format to use, using the Format button or the Set Record Format menu item from the Wave menu.

2. Click on the Record button, or select Record from the Wave menu.
3. Speak into your microphone. You will see the Counter time indicators moving. When finished, click on the Stop button.
4. To play your new file, just click on the Play button.
5. To save your file, select Save Recording under the Wave menu.
6. After saving, the file name will show in the Current File window.
Note: You can record from sources other than your microphone (your CD drive or a device attached to your Line-In connector, for example). To change the audio source, use the System Mixer's recording controls.
Choosing Wave Player Record Settings
Wave Player lets you record audio in different data formats, for different uses. Some data formats offer excellent sound quality, while others sacrifice sound quality but require less disk space.
To pick a recording data format:
1. Click on Wave Player's Format button, or select the Set Record Format menu item from the Wave menu.
2. Choose among the audio formats in the Set File Format window.
3. You can create your own audio format by typing a format name into the Name field and clicking on Save As.
System Mixer
System Mixer Overview
System Mixer lets you control all audio output and input levels.
The System Mixer's Controls
System Mixer displays the volume controls that your audio drivers make available. The names for these controls may vary.
Note: A choice of mixer control styles may be available through the Choose Style menu item of the Mixer menu.

Volume Control: Clicking on this button shows and lets you use the output level controls.
Recording Control: Clicking on this button shows and lets you use the input level controls. (Note: many voice recognition applications use the Voice Commands input levels instead.)
Voice Commands: Clicking on this button displays and lets you use the input level controls reserved for voice recognition programs.
Input and Output Level Sliders and Buttons: For each input or output signal type, a control (for example, a vertical slider, or "fader") controls the loudness, a horizontal slider controls balance between the two speakers, and the mute button temporarily stops input or output without changing slider positions.

Note: A choice of mixer control styles may be available through the Choose Style menu item of the Mixer menu.
Control types and names vary. Some common types are listed below:
- Wave: Controls digital audio (wave) playback or record levels.
- Synth: Controls the MIDI music (music synthesis) play level.
- Line: Controls the audio hardware's Line In or Line Out levels. Line levels might be for an externally attached cassette player, e.g.
- CD: Controls the CD drive output level, for CD drives configured to play their audio output through the PC's audio hardware.
- Vol: The master control for all outputs. The strength of an output signal is determined by both the Vol slider and the slider for the individual output. To affect all outputs, move the Vol slider. To change the output of an individual output type, move its slider.
- Mic: Controls the microphone input level.
Mute Buttons: Toggle between muting and enabling the signal. A button with a lit LED is enabled, while one with its LED not lit is muted. Several output signals can usually be enabled at once, while input signal types are often limited to a single active input.

Settings Presets: Clicking on a Preset button loads an previously saved set of mixer settings. Presets buttons are numbered 1 to 5.
Memory Button: To save the current settings as a Preset configuration, press the memory button and then a Preset button.

Current Settings Display: Shows the name of the current Settings Preset, if any, along with the Settings Preset button number.
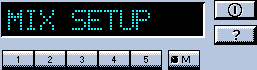
Note: Preset buttons and the Current Settings Display may not be shown on systems with a lot of controls, due to lack of space.
Power: Hides the System Mixer component from display.

Help: Shows the System Mixer's On-line User Guide.

Setting Recording & Playback Levels
The controls for each signal type set that signal's level relative to others. The master Vol control affects all output signal types equally, and sets the overall output level. If, for example, the Wave and Vol levels are at half strength, wave audio output will be at one quarter strength.
To change signal levels for output and input:
1. Click on the Volume Control (for output levels), Recording Control (for most input levels), or Voice Commands (for some voice recognition program input levels) button at the left side of System Mixer to display the level controls.
2. Use your mouse or keyboard arrow keys to move each control to adjust the signal level. If you are playing or recording audio of that type, you should hear the volume level change as you move the control. You can also use keyboard "hotkeys" to control audio output volume at any time. To enable and select hotkeys, use the Hotkeys menu item from the Mixer menu.
3. Use your mouse or keyboard arrow keys to move the balance controls horizontally, left or right, to set relative level between the left and right channels.
4. To turn off (mute) a signal, click on its mute button. Muted controls do not display a lit LED light. To enable an input signal on systems that allow only a single input at once, click on the button beneath the input type so that its LED lights.
Notes: If you click on a control's movement track, the control moves immediately to that point. To move the keyboard focus to a control, either click on it or use the Tab key. To move a control, use your mouse or your keyboard arrow keys. To center a control, press the spacebar.
Using Hotkey Output Level Controls
You can use keyboard key combinations to adjust the master output level, without using on-screen mixer controls. This lets you adjust output while keeping Media Rack minimized, e.g.
Using hotkeys, you can raise, lower, or mute the master output level. Each of these actions requires a combination of three keyboard keys pressed simultaneously. In each case, you hold down the [Ctrl] and [Alt] keys while pressing a third key. You can select the keys to represent these actions, and enable or disable the hotkey function, using the Hotkeys menu item from the Mixer menu.
Using System Mixer Presets
System Mixer stores up to five Preset configurations. Presets allow you to switch instantly to settings you've saved, appropriate for different purposes. For example, you might save one configuration for quietly recording reminders to yourself and another louder configuration for multimedia presentations.
Note: Preset buttons and the Current Settings Display may not be shown on systems with a lot of controls, due to lack of space. You can choose whether to display the preset controls with the Show Mixer Presets menu item from the Mixer menu. You can also choose the color for the Current Settings Display with the Color menu item from the Mixer menu.
To create a mixer configuration and assign it to one of the Presets:
1. Adjust the mixer settings, both input and output, as desired.
2. Click on the Memory button. You will see its LED lit, meaning it is ready to store your settings.

3. Click on one of the five Preset buttons.

4. System Mixer will ask you to name the Preset configuration. The configuration name can be up to 10 characters in length.
To restore a settings configuration, just click on the desired Preset button. You should see the sliders move to the appropriate levels.
User Guide Contents
Media Rack Audio Control System
Introduction
- Media Rack Overview
- Media Rack Components
- Showing or Hiding Media Rack Components
- Showing a Media Rack Component's Menu
- Selecting Full or Condensed View
Alarm Clock
- Alarm Clock Overview
- Alarm Clock Configuration Preferences
- Setting Alarms
- Testing Alarm Clock
MIDI Player, Wave Player, and CD Player
- User Controls
- Playing a Single Audio Selection
- Playing Multiple Selections Using a Playlist
- Creating Playlists: MIDI Player or Wave Player
- Creating Playlists: CD Player
- Recording Wave Audio
- Choosing Wave Player Record Settings
System Mixer
- System Mixer Overview
- The System Mixer's Controls
- Setting Recording & Playback Levels
- Using Hotkey Output Level Controls
- Using System Mixer Presets
Media Rack and Willow Pond are trademarks of Willow Pond Corporation. Microsoft, MS, and MS-DOS are registered trademarks, and Windows is a trademark of Microsoft Corporation. Sound Blaster is a trademark of Creative Technology, Ltd. All other trademarks and registered trademarks are property of their respective holders and are hereby acknowledged.
Media Rack software and documentation are Copyright ( 1995 Willow Pond Corporation. Portions are Copyright ( 1993-1994 Digital Soup, Inc. All Rights Reserved.
Information in this manual is subject to change without notice.