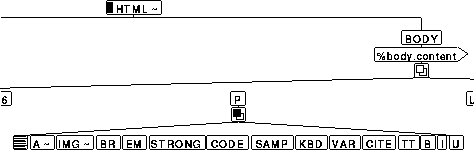
Figure 7.1: Overall structure of a HTML 2.0 file

See the explanation and description of CADE diagrams.
- HTML: the specification
- The mechanics of markup
- Basic file structure
This part of the book describes in detail what HyperText Markup Language (HTML) is and how it works. It forms a tutorial on creating and maintaining these files for the WorldWideWeb, with exercises at the end of each chapter. By this stage you should be familiar with the concepts of the Web and hypertext, and you will already have encountered some of the aspects of HTML, so I suggest you read these chapters at your computer, where you can practice and experiment as you read.
You don't have to have a server of your own running to do this: most browsers have an Open Local function which lets you display a file from your local hard disk exactly as it would if you had retrieved it from a server on the 'net.
HTML was conceived by the inventor of the WorldWideWeb, Tim Berners-Lee, and was further developed by Dan Connolly, Dave Raggett and a team of volunteers. Early on it was recognised that users, developers, and authors needed to have a reference point for HTML so that there was agreement about the meaning and usage of the language. This team now forms the Internet Engineering Task Force (IETF) Working Group on HTML who have finalized the revised standard, called HTML 2.0.
Like any new application, HTML is still evolving. You may come across references to several versions:
You can read the Web version of the specification at http://www.w3.org/hypertext/WWW/MarkUp/MarkUp.html: this reference includes links to the HTML Document Type Description.
Because different browsers are written for systems with differing facilities, the definitions in HTML 2.0 are classified into three levels. These are intended as a guide to authors as to how well their intentions will be reflected in the rendering of their files, because not all browsers support all features of HTML, and the way in which they display a file can vary considerably.
In the earlier stages of browser development, it was taken as a principle that if a browser did not support a particular feature, it would not cause an error, but simply pass on as if the feature was not there. The obvious example is graphics: character browsers don't do graphics, but if they encounter a file with an illustration, they should simply ignore it gracefully, rather than fail.
The level for each element is shown as the element is introduced, and they are included in the reference table at the end.
The HTML DTD also includes some hidden facilities to make HTML texts usable with software for the print-impaired. These are in the form of SGML Document Access (SDA) fixed attributes in support of easy transformation to the International Committee for Accessible Document Design (ICADD) DTD. ICADD applications are designed to support usable access to structured information by print-impaired individuals through Braille, large print and voice synthesis. The ICADD community has a mailing list icadd@asuvm.inre.asu.edu (run by LISTSERV), and there is an experimental transformation service at http://www.ucla.edu/ICADD/html2icadd-form.html with a Braille output option.
We have seen that HTML uses textual markup to identify the structure of your document. It does this by using keywords called tags to surround portions of your text, so that the computer can recognize the elements which make up your document. If this is the title of your document:
My first attempt at an HTML file
just putting it on a line by itself doesn't actually mean `hello, I'm the title', because there's nothing there which can tell the computer that it is a title. HTML lets us identify the title of a document as an element called `Title' by enclosing it in tags:
<title>My first attempt at an HTML file</title>
Notice a few things about the way these element tags are used:
The names of the elements are predefined in HTML: you can't make up your own. They are `case insensitive', so typing TITLE or TiTlE means just the same thing. There's a diagram of the overall structure below and a list of all the elements with a summary of their meaning and use on the reference card at the back of the book. The diagrams appear in the sections where each element is introduced, showing where the element fits into the DTD as a whole, and what other elements it can contain.
Elements fall into one of three classes:
In HTML, most elements are structural: there are also many descriptive elements, but very few visual ones, because the objective is to concentrate on content and meaning, rather than how it happens to look on any one user's machine.
The word `tag' is used to describe the individual start- and end-tags; the word `element' refers to the whole element, including both start- and end-tags and the text content between them.
A few elements are defined as empty: they only have
a start-tag and they don't have any content. For example, <br> is used to mark special line-breaks
(browsers do their own formatting of normal text, so this is only
needed when you want to force a line-break to occur). There isn't any
text to surround, so there's no end-tag:
Mary had a little lamb:<br>
The doctors were surprised.
Figure 7.1: Overall structure of a HTML 2.0 file
See the explanation and description of CADE diagrams.
It is possible to omit the end-tag for some elements in restricted circumstances (a trick called minimization). For example, when one paragraph is followed directly by another, like this:
<p>...information about travel habits was gathered from a sample
of shoppers using an administered questionnaire.</p>
<p>The responses were analysed using the P-Stat
package...</p>
it could equally well be typed with the end-tag omitted from the first paragraph:
<p>...information about travel habits was gathered from a sample
of shoppers using an administered questionnaire.<p>The responses
were analysed using the P-Stat package...</p>
because the start of the second paragraph is completely unambiguous (if a new paragraph is starting, the previous one has to end). However, it is good practice to insert the end-tag unless you know from experience when HTML allows you to omit it. If you are using an editor which understands HTML, then this is handled automatically (see Chapter 6 for details about editing software).
Some start-tags can hold additional information. These items are called attributes, and they occur inside the angle brackets of the start-tag, after the tag name. They are used to make finer distinctions about the meaning or use of an element, or to hold important information which is not to be displayed as part of the text. For example:
<pre width="72">
The width attribute specifies
that the preformatted text defined by the <pre> element should be displayed with a maximum
line length of 72 characters per line.
Attributes are separated from the element name and from each other by a space. They usually take the form of keyword="value" pairs, as in the above example, although in some cases you can use the keyword on its own (this is explained later where it occurs).
Because files have to be portable between systems, HTML uses only plain text: the characters A-Z, a-z, 0-9 and punctuation, which can be used on all computer systems. Accents, symbols and other glyphs which are not in this set of characters are represented using ISO 8859-1 mnemonics (see below). These cover the symbols used in the more common European languages that use the Latin alphabet, and avoid the confusion caused by different manufacturers of hardware and software using their own private sets of character codes.
The mnemonics are called character entities and are
in the form of abbreviations preceded by an ampersand and
followed by a semicolon. For example, you can get an
e-acute (é) in a HTML file by using
é. Table
8.1 lists the ones that can be used in HTML
2.0.
A lot of files in the Web today were created without the help of tools like HTML editors, before it became clear that there's a bit more to making Web files work effectively than just sticking in an arbitrary bunch of tags wherever they seemed to do the most good. At one stage, some developers (for otherwise sound commercial reasons) started inventing their own element tags, and the legacy of these is still with us. Most browsers are very tolerant of malformed files, which means that it is possible to use (some people would say misuse) HTML as if it were some kind of wordprocessing system, where any old thing goes so long as it looks vaguely right. In fact, the best results come from precise and careful use of the right tags in the right places, so we're going to concentrate here on getting your documents to work as efficiently for you as possible.
- Paragraphs and section headings
- All kinds of lists
- Fonts, accents, and symbols
- Block quotation
Before you can start typing a document, you have to give it a kind of skeleton or template into which you can put the text. There are two main parts to an HTML file which give it this basic structure, preceded by a single line declaring the document type as HTML.
This structure is shown in the diagram above.
The skeleton looks like this when viewed in a plain text editor:
<!doctype html public "-//IETF//DTD HTML//EN//">  <html>
<head>  Header information goes here  </head>
<body> Text of the document goes here </body>
</html>
You can see the document type declaration at the top. All the
rest of the file is enclosed in the <html>...</html> tags.
Within this, the document is divided into the head and
body. The <head>...</head> tags enclose the header, which
identifies the file title and any relationships the document has with
the world outside. The <body>...</body> tags surround all the rest of your text.
Notice that the head and body are separate, non-overlapping sections,
entirely contained within the <html>
element.
This identifies the type of file with a special kind of tag called a markup declaration, which has an exclamation mark after the opening angle bracket:
<!doctype html public "-//IETF//DTD HTML//EN">
You should always use this line as the first line of every HTML file, exactly as given here (until the version changes and you add extra markup). If you're editing files with a plain text editor or wordprocessor, you may want to keep this line in a separate template file which you can copy in each time you create a new file.
This line is used by HTML editors and other software to locate a copy of the correct DTD so that they can understand what elements are usable in your file. Fully-compliant editors handle this automatically, and may not even display the declaration, although they will insert it when the file is saved to disk.
If you're using a copy of the HTML DTD in the same directory as the files you are editing, you can use the form
<!doctype html system "html.dtd">
Exercise 8.1: Creating a new file
For these exercises, you need to have some information you want to put into the Web. One good starting point would be to create your own personal page, with information about yourself—a kind of extended business card. You might even want to make it into a Web version of your résumé or curriculum vitae. How you phrase it and what information you put in it is entirely up to you: the objective is to become familiar with using HTML.
Use your editor to open a new file. Insert the document type declaration as the first line (unless you're using something like HoTMetaL or Author/Editor, which use a built-in or precompiled version automatically, and don't display it). Then add the
<html>and</html>tags. Save the file with a name of your choosing, but ending with .html (or .htm if you're on a PC).
A HTML file should be self-documenting: that is, it should contain some information about itself, so that you can identify the file without having to read through it all. You do this with the header, in which you can specify the title of the file and a variety of other information about it.
A header with a title must occur in every file. It's equivalent to a running head in a printed document. Here's an example of a header with a title:
<head>
  <title>How to make $1,000,000</title>
</head>
There are other optional elements which can be included for additional information which we'll come to later. The structure of a header is shown at the top of Figure 7.1.
The <title> element is a kind of
label for recording the function of the file: it is not a part of the
document text. Most browsers show the file title at the top of the
screen, separate from the text, either off to the right-hand side or
in a separate panel labelled `Title' or something similar, so it
should be short enough not to overflow the display: a few words is
usually enough. To display a heading at the start of your text you
use a different element which we'll see in the next section.
Exercise 8.2: Adding a file title
Insert a
<head>element between the<html>and/htmltags, and put a<title>element inside it containing a description of what this file will be. Keep the title under a line long so that it won't overflow the display box used by some browsers to show it. Display the file in your browser.
All of the file after the header is enclosed in the
<body>.../body tags. This is where
all your text, illustrations, forms, tables, and hypertext references
go. The body of most documents consists of a mixture of
elements: some are simple one-line items like section headings,
subheadings, and illustrations; others are blocks of text like
paragraphs and lists, but a lot depends on the nature of the material
and how you want to present it. The structure of the text body and the
elements you can use in it is shown in Figure
7.1.
Exercise 8.3: The text body
Insert the
<body>element between the</head>and</html>tags. As the overall structure up to now is common to all files, you might want to create a macro to insert this kind of skeleton for you (if your editor handles macros: they're a kind of miniature program of prerecorded keystrokes which you can get the editor to play back with a single key).
Inside the body of a document, the most common element is the
paragraph. HTML defines a paragraph with the <p>
element, for example:
<p>If you are ordering for shipment abroad, please add $30 to
cover air freight and insurance charges.</p>
HTML does not recognise blank lines or indentation as the sign
of a new paragraph in the way that wordprocessors or DTP systems do,
but uses the < p> element to enclose each
paragraph. Browsers pay no attention to multiple spaces, tabs, or
linebreaks, but treat them all as a single space (except in one
special circumstance which we'll come on to later) because it is the
markup which defines where elements like paragraphs begin and end.
The paragraph above could equally well have been written as
<p> If  you are ordering
                 for shipment               abroad,
please  add                        $30 to
        cover  air freight and  insurance charges.
</p>
The effect in a browser display would have been just the same in both cases:
You can take advantage of this relaxed attitude to spacing if you are using a plain text editor rather than an HTML-sensitive one, because it allows you to include as much extra spacing as you want to make things easier to edit on the screen, without having to worry about whether it will format properly in the user's display. Paragraphs can contain plain text with the markup elements shown in Figure 8.1.
Figure 8.1: Element contents of a paragraph
See the explanation and description of CADE diagrams.
Exercise 8.4: Adding text in paragraphs
Use the
<p>...</p>tags to insert a few paragraphs of text in the body of your document. Don't worry about their order or placement at the moment: you can always move them around later.
Sectioning is used to divide a document into some form of
logical groups, and each section or subsection usually has its own
heading. HTML allows you up to six levels of section heading, using
the <h1> to <h6> elements.
The top-level heading is used to represent the major divisions
of your text, and the first one in the file normally contains some
kind of title which applies to the whole document. The text is
enclosed in <h1>...</h1> tags,
and this conventionally makes it display in large bold type in a
graphical browser, although some allow the user to select the exact
font, size, and style to suit their own taste. In a character browser
it is positioned, outlined, or highlighted in some other way.
Further levels of section headings are done with
<h2>, subsections with <h3>,
subsubsections with <h4> and so on with
<h5> and <h6>.
Graphical browsers display different highlights, sizes,
colors, or positions of type for the different levels of headings,
conventionally getting smaller or less bold as the depth of
sectioning gets greater. In some browsers the user can change how the
headings display. Mosaic's section headings for <h4> to < h6> actually
use smaller type than that used for the normal text of paragraphs.
Here's an example of a top-level heading:
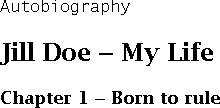
<h1>Jill Doe's own page</h1>
If the file title said `Autobiography', this might display in your browser like this
In character browsers, with a smaller range of typographic variation available, other visual techniques are used for headings, such as centering or capitalising (Lynx), or surrounding or underlining with asterisks, dashes, or dots (Emacs w3-mode).
The top-level heading <h1> is
usually the first element after the <body>
start-tag, so that it displays at the top of the screen when the
document is retrieved. Headings always come between paragraphs, not
within them: putting a heading element inside a paragraph is not
meaningful for the reader (an HTML-compliant editor won't let you do
this anyway). All that a browser will do is split the paragraph in two
and display the heading between the two halves.
Second-level headings (and all the rest) are done in the same way, for example:
<h2>Chapter 1 - Born to rule</h2>
This produces this kind of output when displayed:
The elements you can use inside a heading are exactly the same as those you can use inside a paragraph: these are shown in Figure 8.1.
Section headings in HTML represent section levels, not section
numbers, so <h3> means `heading level 3',
not `section number 3'. Although there are six levels of heading
provided for, each level can occur as many times as necessary. There
is no automated section-numbering in HTML 2.0, but if you need
section headers numbered, you can insert the numbers along with the
text of the heading.
Exercise 8.5: Inserting headings
Insert a
<h1>element immediately after the start-tag for the body, before your first paragraph, and type in it the text that you want displayed as the top heading. Insert a<h2>element between your first and second paragraphs and type a second-level heading in there.
Style guide
Although it is easy to put tags around your headings and paragraphs, and to write a simple document with a header and a body, there are some basic practices which experience has shown to make good sense. This is not to say that you have to do things this way - there are always plenty of reasons why not - but the following guidelines appear to meet the approval of readers of all kinds of material, not just Web hypertext.
Keep files to a reasonable size. Users on slow connections do not appreciate having to wait many minutes to receive a file when they may only want to refer to a few sentences.
Unfortunately, it's impossible to give an optimum length for a file, because even long files can load fast when you're in the same building as the server, and even short files can be slow if you're the other side of the world.
As a rule of thumb, when working with corporate or campus information systems, I try not to create files over 10 screens long (based on the default 22 lines of 80 characters, used in a standard terminal window), simply to avoid the reader getting lost in the verbal jungle. Most are much shorter, a very few are a little longer (whole articles, for example). I have also seen recommendations that no HTML file should be longer than one screenful, but this is perhaps unduly restrictive.
- If you are creating a long document, split it into separate files on section boundaries and make the first page a table of contents. We'll see in Chapter 9 how to reference one file from another.
- Make the file title meaningful and try to keep it under a line long so that it doesn't overrun the window in which it gets displayed, or get in the way in browsers which use the top line of a 25-line screen for it.
- Try to keep headings under one line long as well: top-level (
<h1>) headings in a graphical broswer can take up a lot of space when a large bold font is used.- Keep paragraphs reasonable short, preferably less than a screenful each. Although what constitutes a `screenful' varies enormously (especially as many users read Web documents in a resizable window), try the following guide: a standard 25-line, 80-character screen means 2,000 characters when full, or about 250 words (at an average of 6 characters per word plus spacing and margins), but such solid slabs of text tire the eyes: to keep the reader's interest, try about 16 lines as a maximum, roughly 160 words.
- Write clearly, without overlong sentences or complex grammatical constructions, unless you are writing for a specialist audience who are accustomed to a particular style or content.
This is an indispensable companion for anyone using the WorldWideWeb, whether they are a casual or experienced user or information provider.
I was asked to write the book following the success of the first Developing Countries' Workshop, which I co-taught at Stanford with Ed Krol and Art St George before the 1993 INET Conference in San Francisco, where the Web featured large for the first time.
UCC was one of the earliest Web sites, and one of the hats I wear is as a member of the IETF Working Group on HTML. Tim Berners-Lee, who invented the Web, has been kind enough to write the Foreword, and I hope you'll all rush out and buy it :-)
ITCP have made a selection from the book available, along with a Table of Contents, and you can download the indispensable HTML Reference Card which appears at the back of the book. Here's the full bibliographic record:
@Book{wwwhandbook,
  author = 	 "Peter Flynn",
  title = 	 "The WorldWideWeb Handbook",
  publisher = 	 "International Thomson Computer Press",
  year = 	 1995,
  key =		 "ISBN 1--85032--205--8",
  address =	 "20 Park Plaza, 14th Floor, Boston, MA 02116, USA, and
                  Berkshire House, 168--173 High Holborn, London WC1V
                  7AA, England. See http://www.ucc.ie/~pflynn/wwwbook.html",
  edition =	 "1st edition, with a foreword by Tim Berners-Lee",
  month =	 "June",
  note =	 "Three sections deal with (1) Getting connected to
		  the Internet and using Internet software; (2)
		  Writing HTML (2.0) files for the WorldWideWeb; (3)
		  Running a HTTP server and providing a Web service.
		  Author is a member of the IETF Working Group on
		  HTML.  Text includes additional material on SGML;
		  choice of editors, browsers and servers; copyright
		  and intellectual property; and advance details of
		  HTML3.",
  pages =	 350,
  price =	 "USD 35.00 / GBP 27.00"
}